More and more people are migrating from traditional print server to a cloud-hosted printer server. Cloud hosted service is a technology service that uses infrastructure situated outside the physical location of the user and can be hosted on the cloud. As the infrastructure is located at a cloud vendor’s data centre, the user can gain access to it through a direct network connection, such as a VPN or a remote desktop.
One of the major benefits of hosting your printer server in the cloud is cost-effectiveness. When compared to traditional hosting services, cloud-hosted solutions are more cost-effective as the IT departments don’t have to invest in on-site server hardware. Companies can also gain from the pay-per-use payment with cloud hosting. However, hosting the print server in the cloud can take some while as you will need to migrate your print server from the existing one to a new one.
Migrating or backing up your Windows Print Server
Even if you are not migrating to a cloud print server, you might need to migrate or back up your Windows Print server. The end of support for Windows 2008 necessitated the migration of several services including print server to be migrated to a new server. However, did you know that since Windows Server 2008 R2, you can use Microsoft’s Print Management Console to backup your print server or to migrate all of your print queues, drivers, and most ports to a new server?
However, you should keep in mind is that this tool can only migrate certain types of printer ports like Standard TCP/IP or WSD ports. Unfortunately, it cannot migrate local ports like nul or the TCP/IP Port, so you night need the workarounds provided below. All things considered, it is still a handy way to save yourself hours while undertaking a Print Server migration or give yourself a backup plan when making major changes to your print server. This article will help you understand how to migrate your print server and what to do to migrate it successfully to a new version of Windows server.
Migrating your print server is easy with the help of Print Migration Wizard. The wizard tool will help you to export all the drivers, printer settings, and print queues from the source server into an export file. You can then import that file on the destination server, which will then add in all your printer resources.
The final step is to remove the original source print server and setting the new print server to the same name and IP address as the original source server. This step is necessary to ensure a “seamless” transition on the back end, so that your clients can continue to print without changing any of their settings. In fact, they’ll not even know you made a change! However, if you can’t assign your new server with the same name and IP as the old server, then you will have to reconfigure all of your clients, either manually or via GPO.
Printer Ports that can be migrated
These ports can be migrated or backed-up without issue:
- Standard TCP/IP Ports
- WSD Ports
- COM1, LPT1 (since these already exist by default in Windows)
Printer Ports that can’t be migrated
These ports cannot be migrated or backed-up automatically:
- Local ports like “nul”, often used for Find-Me Printing, will need to be created manually
- Ports that use 3rd-party port monitors like the XYZ TCP/IP Port. If your print server is set up to use the XYZ TCP/IP Port for Hardware Page Checking, you may need a PowerShell script to help you automatically switch all your printers to a Standard TCP/IP Port and back again.
Configuring your new Print Server
Without much ado, let’s get into the process of migration.
Run up your new server. Run through a basic setup and opt for any updates and patches as needed. One the set up is updated, fully patched and ready to run, it is time to set up the print services role by running the following command:
Install-WindowsFeature Print-Services
Next, start the Print Spooler service with the following command
Set-Service -Name "Spooler" -StartupType automatic
Start-Service -Name "Spooler"
The next step is to enable a few firewall rules that will allow you to remotely manage your new server.
Enable-NetFirewallRule -DisplayName "Windows Management Instrumentation (DCOM-In)"

Enable-NetFirewallRule -DisplayGroup "Remote Event Log Management"

Enable-NetFirewallRule -DisplayGroup "Remote Service Management"

Enable-NetFirewallRule -DisplayGroup "Remote Volume Management"

Enable-NetFirewallRule -DisplayGroup "Windows Firewall Remote Management"

Enable-NetFirewallRule -DisplayGroup "Remote Scheduled Tasks Management"

Enable-NetFirewallRule -DisplayGroup "Windows Management Instrumentation (WMI)"

Enable-NetFirewallRule -DisplayGroup "File and Printer sharing"
Now, your new print server is ready to proceed.
Exporting your Source Print Server Settings
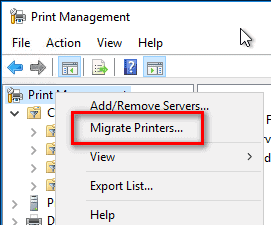
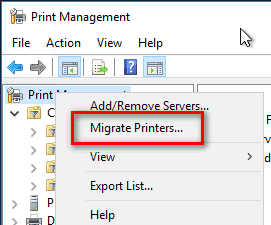
To export your source printer server, start the Print Management console. From the console, right click on Print Servers, and then click on Migrate Printers.

Select Export printer queues and drivers to a file, then click NEXT.

Enter the name of your source print server, then click NEXT.

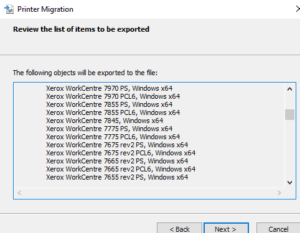
You’ll then be offered with a list of the resources that will be exported, click NEXT.
Select a name and location on your new print server where you want to save your printer export file, then click NEXT.

The export process may take a few minutes to complete. Once it finishes, you will have all of your printer resources from the source print server in a file. Also, remember that sometimes it can be quite a large file.
Importing your Print Server Settings
The next step after exporting the new printer server is to import your old printer server settings. For this, from the Print Management console, right click on Print Management, then click on Migrate Printers again to begin the Migration Wizard.
In this step, you should choose Import printer queues and printer drivers from a file, then click NEXT.

Specify the path the file you created in the Export task, then click NEXT.
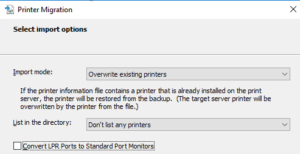
Windows will parse thru the file to load its’ printer objects, and give you a list to review, if it looks correct, click NEXT. Select This print server (\\PrintServerName) and click NEXT. Select Import mode: Overwrite existing printers, and List in the directory: Don’t list any printers, then click NEXT.
We select to not list them, because they are already published in Active Directory by the source print server, and we would rather not make duplicates.
Once you have completed the import process, you will be prompted by the wizard to view the event log for any errors that might have happened during import.
If you encountered any “problem” drivers, go ahead and manually install them on your new server now.
Switching Over to the New Print Server
Now that you have all of your printers installed on your new printer server, it’s time to proceed with the next steps. For effective functioning of your new printer server, there are three things you need to do. The first step is to remove the printers listed in by the source print server in Active Directory. Next, you will have to rename your servers. Lastly, you will re-add your printers from the new print server back into Active Directory.
Let us get on with the process:
On your source print server, open your Printer Management console and select all of your Printers. Right click on them and then select Remove from Directory.

Now proceed with renaming your source print server to something else, and assign it’s original name to your new print server. After your new print server has be given the original server’s name, reboot it so that the name change takes effect. You are all done with the source print server, and you will only be working on the new print server from this point.
Open the Printer Management console and select all of your printers. Right click on them and then select List in Directory.
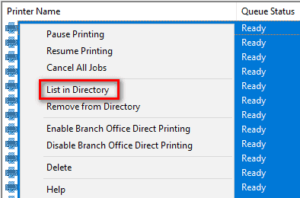
This will re-publish all of the printer back in the Active Directory and complete your task of migrating the Print Server to a new server. However, you may want to power off your old print server then give the new one the same IP address and hostname as the old print server so that clients can continue printing. And just like that, you should be back in business. That means you should be able to print again without any problems, to your heart’s content or until the toner runs out, whichever happens first.

