
Building an Active Directory lab is easy and is a great way to learn, test and troubleshoot Active Directory.
Lets dive right in.
Active Directory Lab Environment Overview:
This guide will cover the following.
- Create an Isolated network using 192.168.20.0/24 network. The Active Directory test network will not have access to other networks or have internet. You can change this but is not recommended.
- Create two virtual machines (Windows Server 2019, Windows 10 Enterprise).
- You will create a new Active Directory forest using mylab.local for the domain.
- Bulk create 21 organizational units using PowerShell.
- Bulk create 20 security groups using PowerShell
- Bulk import 3,000 user accounts using PowerShell.
Hardware Requirments:
Most computers and laptops should have no problem running multiple virtual machines. Below are the minimum requirements:
- Any intel or AMD processor will do. Windows Server 2019 requirement is 1.4 GHz 64-bit processor.
- 6GB to 8GB RAM
- 50 GB free disk space
I’m using a Lenovo L14 laptop and I have no issues running multiple virtual machines.
PowerShell Scripts:
Download the scripts below and place them in the c:\it folder on the Active Directory server.
Included scripts:
- create_groups.ps1 = Script for bulk creating AD security groups from the groups.csv file
- create_ous.ps1 = This script will create the organizational units using the ous.csv file.
- create_users.ps1 = This script will bulk import 3,000 users and place them in organizational units.
Lesson 1: Install VirtualBox
In this lesson, I’ll show you how to install VM VirtualBox on your computer. VirtualBox is a free hypervisor that lets you create virtual machines on your local computer.
VirtualBox is available for Windows, Linux, MAC, and Solaris systems. Other hypervisors such as Vmware and Hyper-V also work great for creating an Active Directory test environment.
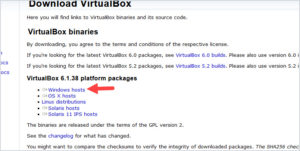
Step 1: Download VM VirtualBox
Click the link below to access the VirtualBox download page. Download the installer for your operating system.
For this example, I’ll download the Windows installer.
Step 2: Install VirtualBox
1. Run the downloaded installer file.
2. On the welcome screen click “Next”
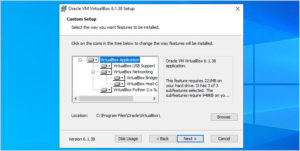
3. On the Custom Setup page leave the defaults and click “Next”.
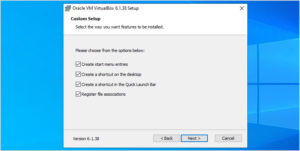
4. On the options screen select install options and click “Next”. I chose to leave the defaults.
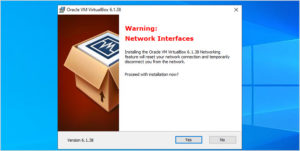
6. On the warning screen click “Next”. I didn’t notice any disconnect during the installation.
7. On the read to install screen click the “Install” button.
8. Click “Finish”.
There should now be a shortcut on your desktop or start menu titled “Oracle VM VirtualBox”. Open VirtualBox and you will get the welcome screen.
That completes the installation of VirtualBox.
Note: After creating the windows server in lesson 2 you will need to install the VirtualBox guest additions to be able to copy and paste files from your host computer to the VM.
Lesson 2: Install Windows Server
In this lesson, you will download the windows server ISO create and create a virtual Windows Server. In addition, you will configure the server with a static IP address and change its hostname.
Step 1. Download Windows Server ISO
Microsoft lets you download Windows Server and run it for 180 days. You will need to register to download the ISO.
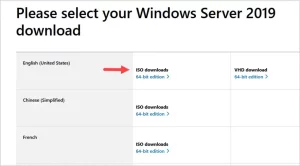
Click here to download the Windows Server 2019 ISO.
On the download page click on your language to start downloading.
When the ISO has finished downloading move to step 2.
Step 2: Install Windows Server on VirtualBox
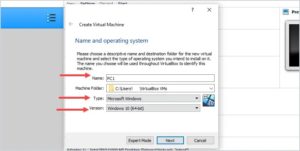
1. Open VirtualBox and Click on “New”.
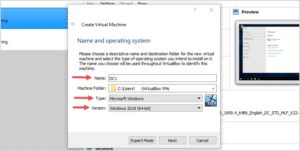
2. Give the virtual machine a name, set the type to “Microsoft Windows” and the version to “Windows 2019 (64-bit). You can change the machine folder path, I’ve left mine as the default path.
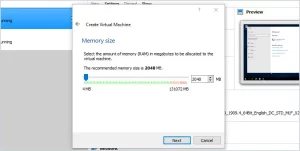
3. For the memory size leave it as the default, and click “Next”.
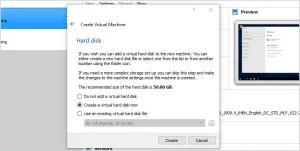
4. For the hard disk select “Create a virtual hard disk now” and click “Create”.
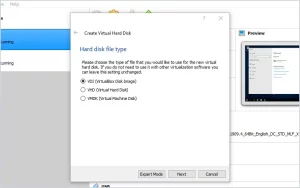
5. Hard disk file type leave as VDI. Click “Next”
6. Leave the hard disk set to Dynamically allocated and click “Next”.

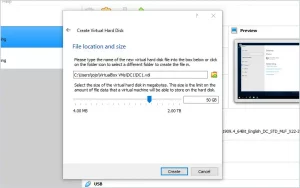
7. For the file location and size leave it as default and click Create.
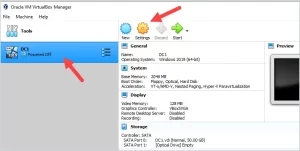
8. Next, select your server and click the settings button.
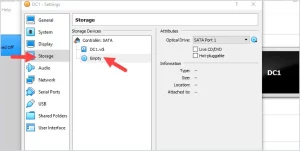
9. Click on “Storage”, then click on “Empty”.
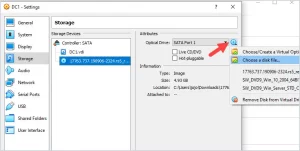
10. Click the disk icon, then select the Windows Server ISO file you download.
11. Click “Network” and select Internal Network.
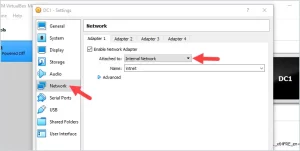
The Internal Network option will create an isolated network. You do not want an Active Directory test environment to have access to other networks as it could cause problems. This is very important if you will be running penetration tests on your test domain.
Now it’s time to power on the VM and start the windows server install process.
1. Click the Start button.
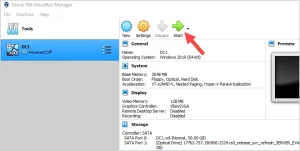
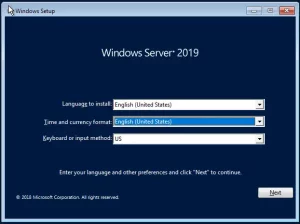
The VM will boot from the ISO and start the installation for Windows Server.
2. Enter language preferences and click next.
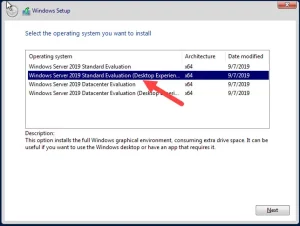
3. Click the “Install Now” button.
4. Select Standard Evaluation (Desktop Experience) and click “Next”.
5. Accept the license terms and click “Next”
6. Select Custom: Install Windows only.
7. Select the Unallocated Space and click “Next”.
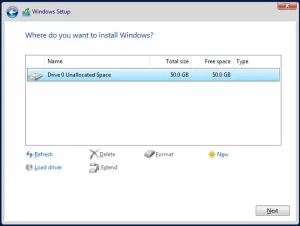
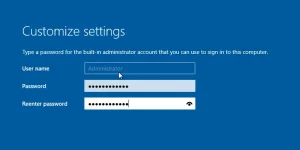
The installation starts and when completed you will be prompted to create a password. Enter a password for the Administrator account and click finish.
Install is complete. You just created a virtual Windows Server, nice work!
Step 3: Configure IP Address and Hostname
Now you need to configure the server with a static IP address and change the hostname.
Since this is on an isolated internal network you can assign it to any internal IP address. I’ll assign my server the following:
- Hostname: DC1
- IP Address: 192.168.20.10
- Subnet Mask: 255.255.255.0
- Gateway: None
- DNS: 192.168.20.10
Make sure the DNS points back to its own IP address. This is required when promoting the server to a domain controller.
Steps to assign the static IP address:
1. Right-click on the start menu and select “Network Connections”
2. Click “Ethernet” from the left menu.
3. Click “Change adapter options”
4. Right-click your ethernet adapter and select properties.
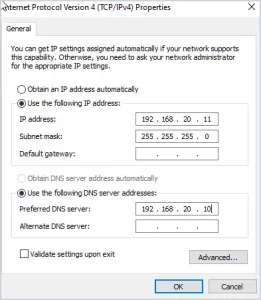
5. Select “Internet Protocol Version 4 (TCP/IPv4) and click properties.
6. Fill out the IP address details and click ok.

You do not need to give the server a default gateway.
Steps to change the hostname:
1. Right-click on the start menu and select “System”
2. Click on “Rename this PC”
3. Give the server a new name and click “Next:
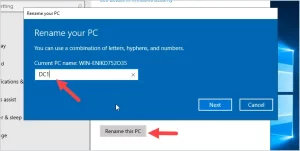
After clicking “Next” you will be prompted to restart the PC, click “Restart Now”.
That completes the server settings. In the next section, I’ll walk through installing Active Directory.
Lesson 3: Install Active Directory
In this lesson, you will install the Active Directory domain services role and promote the server to a domain controller.
I’ll show you two options for installing Active Directory.
- Option 1: Install Active Directory using GUI
- Option 2: Install Active Directory using PowerShell (much faster)
Option 1: Install Active Directory Using GUI
1. Open Server Manager
2. Click on Add roles and features

3. Click “Next” on the Before You Begin screen.
4. For installation type select “Role-based or featured-based installation and click “Next”.
5. Select your server and click “Next”

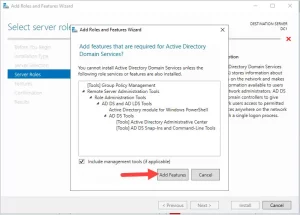
6. For Server Roles select “Active Directory Domain Servers”
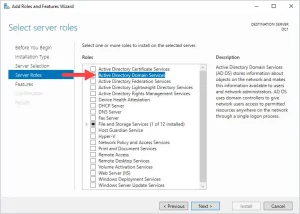
You will get a pop up to add the required features for this role. Click on Add Features.
7. On the Select features page click “Next” No changes on this page.
8. On the AD DS page click “Next”
9. On the confirmation page click “Install”
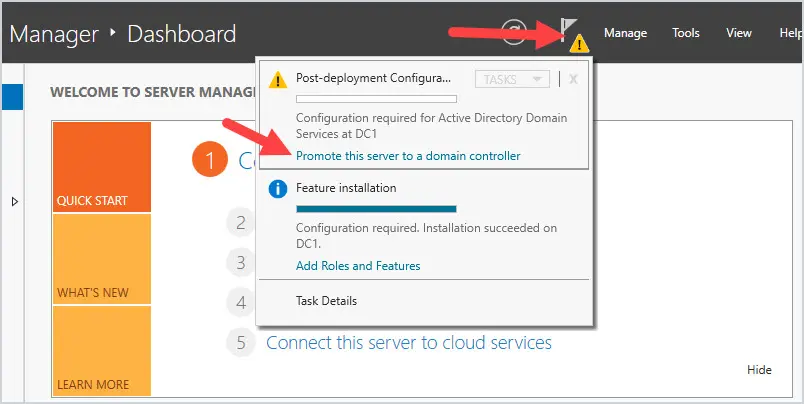
When the installation is complete it will say “Configuration required”
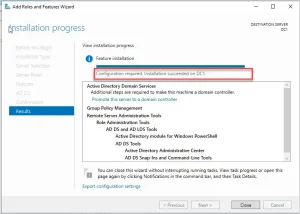
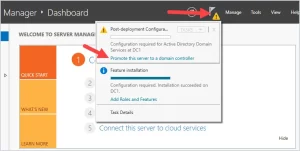
Click “Close”
Click the yellow exclamation mark at the top and click “Promote this server to a domain controller”
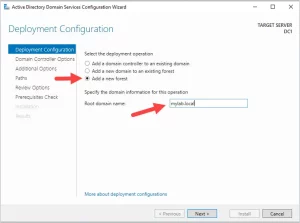
10. Select “Add a new forest” and enter a root domain name. You do not need to purchase a domain name, you can make up a domain name for this step. I’ll use mylab.local.
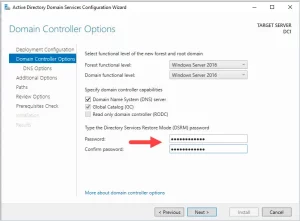
11. Domain Controller Options: Enter a DSRM password and click next. The DSRM password is only needed if you need to recover Active Directory from backup.
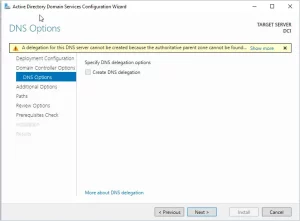
12. DNS Options: You will get a warning about delegation. This is normal click next.
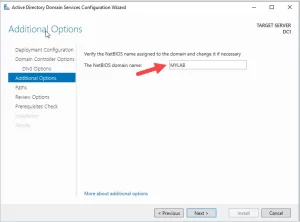
13. Additional Options: Enter a NetBIOS name and click next. The NetBIOS name is limited to 15 characters. Microsoft describes the NetBIOS name as the subdomain of the DNS name.
14. Paths: Leave defaults and click “Next”
15. Review Options: Click “Next”
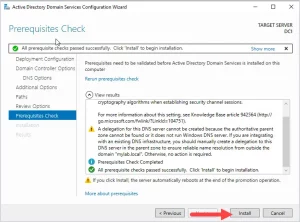
16. Prerequisites Check: It is normal to get a few warnings. You should see a green check if the prerequisites pass. Click “Install.
When the installation is complete the server will reboot.
That completes this lesson. Congratulations you just created an Active Directory server.
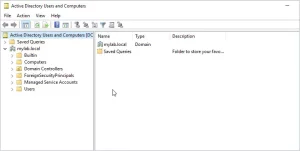
Log into the server and open Active Directory Users and Computers (ADUC). ADUC is located in start -> Windows Administrative Tools.
Option 2: Install Active Directory with PowerShell
Use this command to install the Active Directory Domain Services Role.
Install-WindowsFeature AD-Domain-Services -IncludeManagementTools
Then use this command to promote the server to a domain controller.
Install-ADDSForest -DomainName "mylab.local" -CreateDnsDelegation:$false -DomainNetBiosName "mylab" -InstallDns:$true
You will be prompted to create the directory services restore mode password.
That’s it for option 2, much faster right?
Lesson 4: Bulk Import Users, Groups & OUs
Now that you have created the Active Directory server it’s time to add some organizational units, groups, and users.
For this lesson, you will use the provided PowerShell scripts.
Step 1. Bulk Create Organizational Units
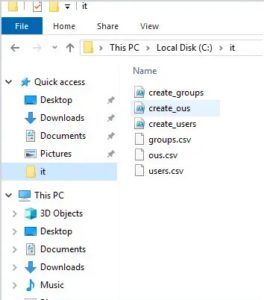
1. Copy all of the scripts into c:\it on your domain controller.
Your folder should contain the PowerShell script and a csv file. Below is a screenshot from my domain controller.
2. Run the create_ous.ps1 script.
Open the script and click run to create the OUs.
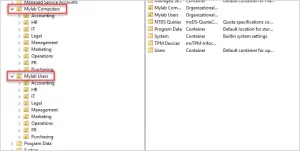
When the script is done, open ADUC and check that the parent and sub-OUs have been created.
Step 2: Bulk Import Groups
1. Open the “create_groups.ps1” script and run it.
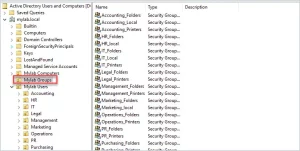
2. When the script is completed open the “Mylab Groups” OU to verify all the groups have been created.
Step 3: Bulk Import Users
Now it’s time to bulk import about 3000 user accounts into your Active Directory test domain.
1. Open the “create_users.ps1” script and click run
2. When the script is completed, open Active Directory and check the department folders for user accounts.
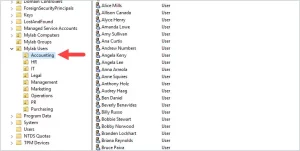
Below I checked the Accounting OU and it is now populated with a bunch of user accounts.
You can also run the below PowerShell command to list all domain users. This will output all of the users to a grid so you can browse and filter the results.
Get-ADUser -filter * -Properties * | Select name, department, title | out-gridview
If you have followed along you should now have an Active Directory lab environment complete with OUs, groups, and users.
The last step is to join a computer to your new AD domain.
Lesson 5: Join Computer to The Domain
In this last lesson, you will download and install Windows 10 Enterprise.
Click here to Download Windows 10 Enterprise.
You will be required to enter your details to download the ISO.
Follow the same steps as you did when creating the server for creating the Windows 10 computer. Name it PC1, change the storage to boot from the ISO, and change the network to an isolated network.
During the install when it says “Let’s connect you to a network” Click on “I don’t have internet”. You will configure this later.
Click on “Continue with limited setup”.
Enter “mylab” for a username.
Create a password and security questions.
Turn off all the privacy settings.
Click on “Not Now” for Cortana.
Now set the following IP settings:
- IP address: 192.168.20.11
- Subnet Mask: 255.255.255.0
- Preferred DNS: 192.168.20.10
Click OK.
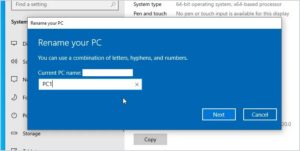
Next, rename the PC to PC1 and click next.
You will be prompted to restart, click “Restart Now”.
Log back in and you will now join the computer to your Active Directory domain.
Go into system settings -> Rename this PC (advanced).
Click the “Change” button
Enter mylab.local in the domain field and click ok.
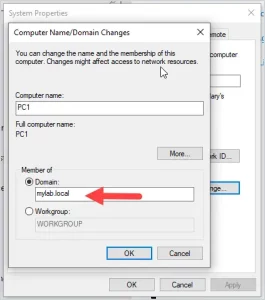
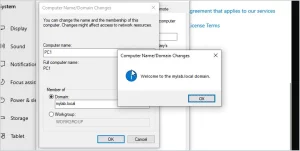
Enter your domain administrator and password.
The computer is now joined to your domain.
If you want to add a computer to the domain with PowerShell, use the command below.
add-computer –domainname "YourDomainName" -restart
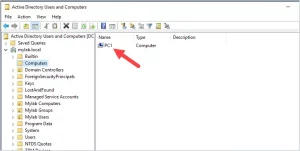
If you go back to Active Directory Users and Computers you will see PC1 in the “Computers” OU. You can move the computer object to one of the computer OUs you created.
Let me know if you have any questions by posting a comment below.